FAQ & How-to Videos
Below you will find our most frequently asked questions you need to know, so you can use your Hero Camper like a pro.
Hero Camper
How to fix charger from the car?
The Hero Camper 13-pin trailer plug is wired in accordance with ISO 11446. If you experience problem in relation to the wirring, please inspect the wiring diagram of the car.
For referrence, check ISO 11446 table below:
ISO 11446 Table
Contact No. | Function |
|---|---|
1 | Left-turn light |
2 | Rear fog light |
3 | Common return for contacts 1, 2, and 4-8 |
4 | Right-turn light |
5 | Right-hand rear, position, marker lights, and licens plate lights |
6 | Break lights |
7 | Left-hand rear position lights, maker lights, and licens plate lights |
8 | Reversing lights |
9 | Constant power supply (+12 V) |
10 | Power supply controlled by ignition switch (+12 V) |
11 | Return for contact no. 10 |
12 | Reserved for future allocation |
13 | Return for contact no. 9 |
How to fix charger not recharging the AUX battery when it is flat?
Sometimes the battery may be completely flat after some time. Therefore you will need to boost the battery by a charger.
Follow these 7 steps to boost the battery:
- Connect 230v to assure power and LED1 is now turning green
- Press and hold main button for 5 seconds to enter working mode
- Press main button again to enter charger mode and Led5 is now turning green/on
- When LED1 stops flashing, you are now in power supply mode
- Leave it on for 30 seconds and then the battery is jump started (do not let the battery stay in power supply mode for more than 30 seconds as it is not good for the battery).
- Press and hold main button for 5 seconds to turn charger back into charging mode
- Press main button again and when LED1 stops flashing the battery has been charged
Front panel of battery charger BS1210
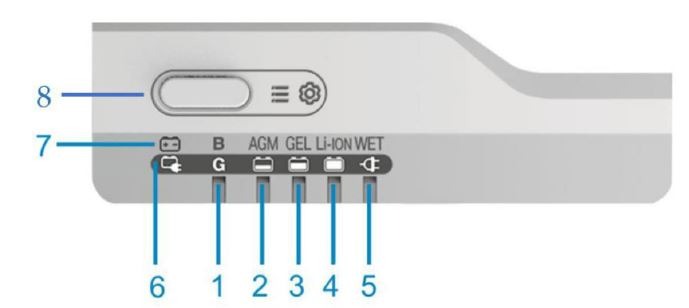
No. | Description | Remarks |
|---|---|---|
1 | LED1 | Blue = battery type | Green = charging stages |Flashing = faulty |
2 | LED2 | |
3 | LED3 | |
4 | LED4 | |
5 | LED5 | |
6 | LED of charging | |
7 | LED of battery type | |
8 | Main button |
See how to boost the battery with a charger in the video below:
How to fix the light panels although I have sufficient charge on my AUX battery?
If the lights in the cabin do not turn on although you have sufficient charge on your AUX battery. Light remote WMSP4 has been reset. If you want to delete a remote you hold in the “Fridge” button for 5 seconds until it starts flashing. All the remotes are now deleted and they do not work.
To fix the lights in the cabbin or pair the remote panels follow these steps:
- Go into search mode. Press button “night mode” for 5 seconds. Then “night mode” button will flash. It is now in search mode. Notice: If you do nothing for 1 minute it will cancel search mode.
- Searching. Push any bottom for 1 second. When the water level indicator lights flashes 5 times, pairing is successfull. The system can match up to 5 WMSP4 panels.
- Now the lights will work.
- Now repeat step 2 for all the panels you want to pair.
Notice: If you pair remotes panels up to max. limit, then water level indicator lights will be on for 3 seconds. It means you reached the max. limit. Then you need to clear all the paired WMSP4 panels.
See how to fix the lights altough you have sufficent charge on your AUX battery in the video below:
How to fix no electricity (CRS17 reset)?
If you suddenly experience none of the electric components responding or working, please follow these 4 steps below.
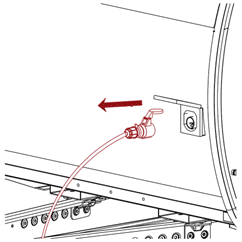
1. Remove the 230v CEE-cable in front of the camper.
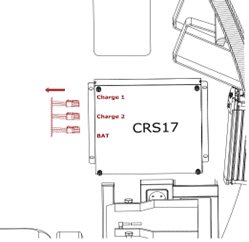
2. Remove the 3 multiplugs (Charge1 & Charge2 & BAT) from the CRS17 located behind the seat
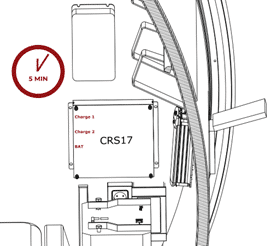
3. Wait 5 min. for the system to reset.
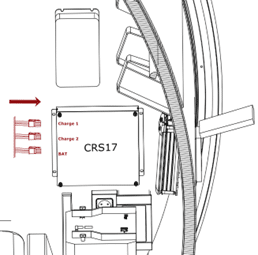
4. Insert the 3 multiplugs again. If this does not work, we recommend 1 more try before contacting your dealer.
If you still experience issues, you might need to see our other guides:
- How to fix charger not recharging the AUX battery when it is flat
- How to fix the light panels although I have sufficient charge on my AUX battery
Why is there water in my cabin by the door?
First check the reason why there are leaks in the door on the Hero Camper. There may be sand, dirt or objects trapped such as a bed linen in the door seal. If the door gasket is worn, we recommend that you buy a new door gasket. See installation guide for how to install a new door gasket.
How to close the rear door?
How to close the rear door of the Hero Camper, you need to follow these 4 steps:
- Release the locking mechanism on the left gas strut to close the kitchen door. Make sure to hold the door with one hand while doing so.
- Now close the door so you hear one click. Note: The door is not locked completely.
- Give it a firm push horizontal, directly in “do not push down”. Push in. You will hear a second click, and the door is locked completely.
- Always lock the door with a key before moving the Hero Camper.
See how to close the rear door of the Hero Camper in the video below:
How to fix the rear door's hinges, if it does not open and close corretly?
FRP bottom panel and backdoor can flex during cold/hot conditions. Backdoor pin needs adjustment. First you need to open the rear door full up before you start to mount off the gas springs. Be aware that when mounting off the gas spring you have the full weights of the rear door. Therefore you should find something you can lean the rear door on, for instance a ladder placed at the end of the rear dor where the lock is.
Follow these steps if the backdoor pin needs adjustments:
- Before we can start to adjust the hinges you need to take of the gas springs on both sides.
- Open the rear door completly before removing the gas springs.
- Remove the small clip and be careful not to loose the clip.
- Hold the rear door completly up and you can pull it off.
- When you have mounted off both gas springs, you should be able to loosen the 4 bolts holding the hinges. You are now able to move the rear door up and down.
- Move the rear door to the right if you need the door to be move down and move it to the left if you need to move it up.
- When you have adjusted the rear doors tighten the bolts again.
- Put the clips back on the gas springs back again.
Notice: The rear door handle might also need to be adjusted.
See how to adjust the rear door hinges in the video below:
How to fix the rear door's locking pin, if it does not close and lock corretly?
How to fix kitchen door when not closing and locking properly.
You can fix this by adding a spacer to raise the locking pin. Follow these steps:
- Untighten the nut for the “lock-pin” bolt below the Hero Camper and remove the “lock-pin”. Tools needed: Wrenches size 16 mm and 13 mm.
- Then add a stainless spacer and refit the “lock-pin”
See how to fix the kitchen door not closing and locking properly in the video below:
How to roll out the awning?
When rolling out the awning it is important to take notice of the following:
- Only roll out the awning just enough to be able to get the support legs in place.
- Place the support legs on the ground before you roll out the entire awning. This will prevent unnecessary unbalanced weight distribution and prevent damage to your awning.
- Unfold the legs and place them on the ground. Then lock the hinges.
- We always recommend using pegs for the support legs.
- Now roll out the awning a little more but make sure the legs are supporting all the way out to the desired length.
See how to roll out the awning in the video below:
Hero Skybox
How to open and close the Hero Skybox Kepler?
Follow these 8 steps to open the Hero Skybox Kepler:
- Open all 4 rachets (locations highlited in the red circles)
- Give the Skybox a light push
- Pull down the elastic cord and place it in the clamps on both sides
- Release the secure-strap for the ladder
- Pull out the ladder and the floor of the Skybox will automatic follow
- Open the clamps on each side and pull out the support rails
- Remember to close the clamps on each side
- Mount the support-rail to the frame and place the hook to the Skybox’ side panel
Follow these 11 steps to close the Hero Skybox Kepler:
- Open the windows on both sides
- Dismount the side panels
- Open the clamps in each side
- Push down the support rails each side
- Lift and push the ladder towards the Skybox
- Please ensure the ladder and support rails are fully closed
- Refit the elastic cord
- Pull down the Skybox cover
- Place the belt underneath the ladder for security
- Fit the belt inside the Skybox
- Remember to secure all 4 ratchet clamps and tighten them well
See how to open and close the Hero Skybox Kepler in the video below:
Robot Trolley
How to pair a Robot Trolley and its remote?
How to pair the remote and the Robot Trolley, you need to follow these 3 steps:
- Start by pressing the “power” button on the Robot Trolley. The green light power indicator will now turn on.
- Press the “forward” button on the remote for two seconds. The green battery indicataor will now light up.
- On the Robot Trolley pess and hold down the “power” button and at the same time on the remote press and hold down the “turn right” button (right arrow) for five seconds. The green LEDs on the Robot Trolley and remote will now flash.
See how to pair a Robot Trolley and its remote in the video below:
How to mount universal high lift bracket?
How to mount universal high lift bracket on your unit to get the most out of your Robot Trolley. Follow these steps:
- Make sure to mount the bracket as far back as possible to get the most downforce on the Robot Trolley as possible.
- Slide the bracket as far back as possible, but make sure to leave space for the handle to turn.
- Now tighten the bolts.
See how to mount universal high lift bracket in the video below:
Cooling & Heat
How to fix no power or no response from the remote K2400 & K3600?
K2000 and K2400 – no power or no response from the remote. This Issue may refer to the fuse.
Notice: Always disconnect the power before opening the airconditioning.
To fix the no power or no response from the remote follow these 8 steps:
- Remove the 12 pcs. M3 umbraco bolts located around the top cover
- Remove the cover
- Locate the control box
- Remove the PH screw and disconnect the wire
- Remove the 4 pcs. PH screws (2 on each side)
- Remove the 2 last PH screws from the top cover of the control box
- Locate the cover for the fuser and open the top cover from the side
- Check if it is pushed down and not lose. It can also be defect and replace it and make sure it is pushed all the way down (the fuse is a F5AL250V 5*20mm)
See how to fit the no power or no response from the remote in the images below:
If you did not find the question you were looking for. Please contact your local Hero Camper dealer


